Spring WebSocket on RabbitMQ
In this project I was working at, we had websockets implemented over the STOMP protocol. These websockets were currently maintained by our application container. Since we wanted to achieve a multi-instance production environment we would have to use a single message broker so messaging can reach any connected endpoint, not only the ones known by each application container.
This is the second part in the process of externalizing state and responsibilities from application containers. Here you can find the first part and the source code for this demo is on GitHub.
Problem
Our application used websockets to send notifications to connected users. So far, so good. The thing is that we were using our application container message broker implementation and when running multiple application containers, notifications could obviously not reach all intended users because their connection might have been established with any application container, possibly not the with the one sending the message.
Solution
RabbitMQ is a message broker software that can be integrated to the Spring ecosystem. In this scenario our application container receives websockets connections and relay them to RabbitMQ. This way all websockets are knowledgeable by any application container and can get notified.
 Source: memorynotfound.com
We will implement this architecture in a demo “mural” app so connected users can post to every connected user to see.
Spring WebSocket
Spring WebSocket is the Spring module that enables WebSocket-style messaging support. As Spring WebSocket’s documentation states, the WebSocket protocol defines an important new capability for web applications: full-duplex, two-way communication between client and server.
Server
Let us start by creating a simple Spring Boot app. You can always go to start.spring.io to bootstrap your app.
Add Spring WebSocket dependency:
<dependency>
  <groupId>org.springframework.boot</groupId>
  <artifactId>spring-boot-starter-websocket</artifactId>
</dependency>
We will also want to add the following dependencies to not get a ClassNotFoundException on reactor.io.codec.Codec (stick to these specific versions if working with Spring Boot v1.5.x):
<dependency>
  <groupId>io.projectreactor</groupId>
  <artifactId>reactor-net</artifactId>
  <version>2.0.5.RELEASE</version>
</dependency>
<dependency>
  <groupId>io.projectreactor</groupId>
  <artifactId>reactor-core</artifactId>
  <version>2.0.5.RELEASE</version>
</dependency>
<dependency>
  <groupId>io.netty</groupId>
  <artifactId>netty-all</artifactId>
  <version>4.0.33.Final</version>
</dependency>
And configure the broker relay connection. We do that with the following config class:
@Configuration
@EnableWebSocketMessageBroker
public class WebSocketConfig extends AbstractWebSocketMessageBrokerConfigurer {

  @Override
  public void configureMessageBroker(MessageBrokerRegistry config) {
    config
      .setApplicationDestinationPrefixes("/app")
      .enableStompBrokerRelay("/topic")
      .setRelayHost("localhost")
      .setRelayPort(61613)
      .setClientLogin("guest")
      .setClientPasscode("guest");
  }

  @Override
  public void registerStompEndpoints(StompEndpointRegistry registry) {
    registry.addEndpoint("/websocket-app").withSockJS();
  }

}
In the configureMessageBroker method, configuration is pretty self-explanatory. We first define application prefix for destinations handled by the application itself. Then follows configuration for the message broker: destination handled, host, port and credentials.
registerStompEndpoints allows us to register STOMP endpoints over websockets with Sock.js enabled.
We now need a Controller that will map the messages sent from clients to a specific server destination, in this case message:
@Controller
public class MessagingController {

  @MessageMapping("/message")
  @SendTo("/topic/mural")
  public String send(String message) throws Exception {
    return message;
  }

}
@SendTo will determine that this method’s return will be sent to the specified destination. Destination is topic/mural here and since it starts with topic, messages here will be sent to the message broker.
Client
We first add dependencies for establishing websocket connections in the client side. These are Sock.js and Stomp Javascript libraries:
<dependency>
  <groupId>org.webjars</groupId>
  <artifactId>webjars-locator</artifactId>
</dependency>
<dependency>
  <groupId>org.webjars</groupId>
  <artifactId>sockjs-client</artifactId>
  <version>1.0.2</version>
</dependency>
<dependency>
  <groupId>org.webjars</groupId>
  <artifactId>stomp-websocket</artifactId>
  <version>2.3.3</version>
</dependency>
Then we create a Javascript controller for websocket connection. It implements several features, such as: connect, disconnect, send messages and subscribe to topics.
class WebSocketController {

  constructor() {
    this._onConnected = this._onConnected.bind(this);
  }

  _onConnected(frame) {
    this.setConnected(true);
    console.log('Connected: ' + frame);
    this.stompClient.subscribe('/topic/mural', this.showMessage);
  }

  setConnected(connected) {
    document.getElementById('connect').disabled = connected;
    document.getElementById('disconnect').disabled = !connected;
    document.getElementById('mural').style.visibility = connected ? 'visible' : 'hidden';
    document.getElementById('response').innerHTML = '';
  }

  connect() {
    var socket = new SockJS('/websocket-app');
    this.stompClient = Stomp.over(socket);
    this.stompClient.connect({}, this._onConnected);
  }

  disconnect() {
    if(this.stompClient != null) {
      this.stompClient.disconnect();
    }
    this.setConnected(false);
    console.log("Disconnected");
  }

  sendMessage() {
    var message = document.getElementById('text').value;
    this.stompClient.send("/app/message", {}, message);
  }

  showMessage(message) {
    var response = document.getElementById('response');
    var p = document.createElement('p');
    p.style.wordWrap = 'break-word';
    p.appendChild(document.createTextNode(message.body));
    response.appendChild(p);
  }

}
var webSocket = new WebSocketController();
We now implement a view that will interact with WebSocketController and allow us to send and receive messages through a websocket connection:
<html>
    <head>
      <title>Spring WebSocket Messaging</title>
      <script src="/webjars/sockjs-client/sockjs.min.js"></script>
      <script src="/webjars/stomp-websocket/stomp.min.js"></script>
      <script src="/WebSocketController.js"></script>
    </head>
    <body onload="webSocket.disconnect()">
        <div>
            <div>
                <button id="connect" onclick="webSocket.connect();">Connect</button>
                <button id="disconnect" disabled="disabled" onclick="webSocket.disconnect();">
                    Disconnect
                </button>
            </div>
            <br />
            <div id="mural">
                <input type="text" id="text" placeholder="Write a message..."/>
                <button id="sendMessage" onclick="webSocket.sendMessage();">Send</button>
                <p id="response"></p>
            </div>
        </div>
    </body>
</html>
<head> section imports required Javascript dependencies that we added to the project.
<body> presents buttons for triggering websocket connection and disconnection, a text field for message input, a button for sending the message and a <p> element where received messages will be rendered.
That’s all for the client side configuration.
RabbitMQ
RabbitMQ is a message broker solution which supports multiple messaging protocols. STOMP is one among these supported protocols.
In order to run this demo, we have to install and run RabbitMQ first. It is possible to either download and install it or run its docker image.
As we configured in WebSocketConfig class RabbitMQ is running with default config properties on localhost:61613 and credentials are guest/guest.
Play the result
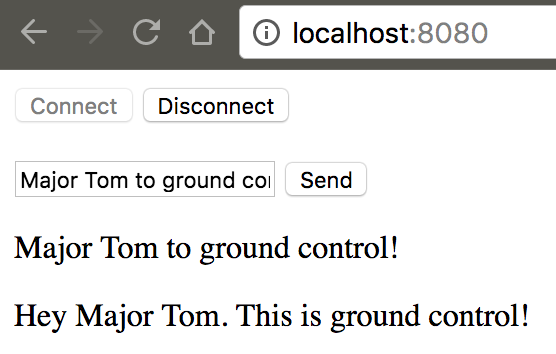
Start our demo app by running SpringWebsocketsRabbitmqDemoApplication class. Once it has started go to localhost:8080. Open one more browser tab at the same address.
Click Connect on both tabs and send messages from both sides. The sent messages will be delivered on all connected tabs including the one who sent it. The following screenshot represents a message sent and another received from a second connected tab:
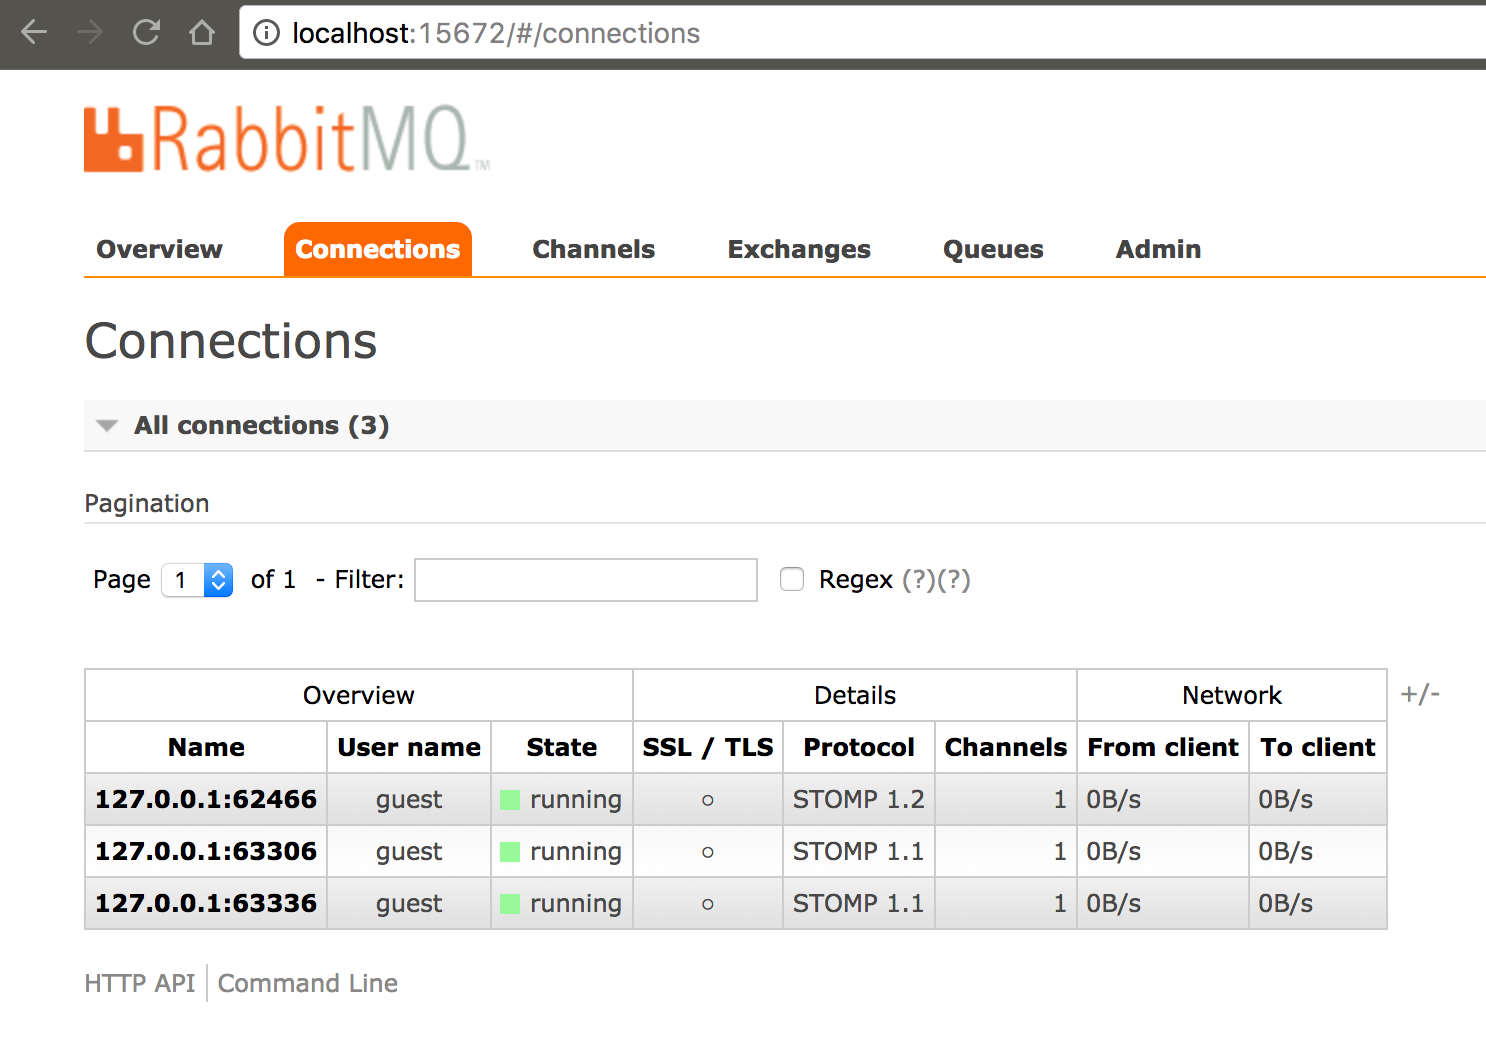
If you have RabbitMQ’s management plugin enabled, you will be able to access localhost:15672 and monitor connections:
Still in RabbitMQ’s management interface you can check Channels and Queues tab. One queue gets created for each connected client, which is represented by a channel. Once a client disconnects both its queue and channel get removed.
In the Exchanges tab there is an exchange named amq.topic. This exchange will be configured by Spring to route messages to queues according to the destination in client subscription we did in our Javascript controller (mural).
Conclusion
Spring WebSocket makes it straightforward to enable websockets and work as a relay to a message broker such as RabbitMQ. This way you may run multiple application container connected to the same instance or maybe a cluster of RabbitMQ instances.
I hope this writing helps someone and feedback is always welcome! :)
References
Besides links throughout this writing, here are some articles that were of help when building this guide:
Post by: Djeison Aguir Selzlein